
A deeper dive into API Gateway features that control the target invocations: throttling, using API Keys, and caching

This post is part of my blog-post series about AWS API Gateway and Lambda functions, but this time the focus is solely on API Gateway. So, after having a working Lambda function behind AWS API Gateway, the next move is to strive to ensure the Lambda function is executed under control.
The gist
We shall focus on three features that can facilitate in controlling the access to an API Gateway method and reduce the number of its target’s invocations:
- Defining Throttling
- Managing API Keys
- Using Cache
1. Throttling
A throttling threshold is a combination of the number of calls per second and the number of allowed bursts. The API Gateway throttles requests using the token bucket algorithm when a token resembles a single request.
To depict this algorithm simply, you can imagine a hose pouring water into a bucket on the one side and a pump drawing the water (from the same bucket) on the other side, while the bucket’s capacity is measured every specific time frame.
In this allegory, the hose flow is equivalent to the number of requests, the bucket size is the burst rate, and the pump suction is the processing pace.
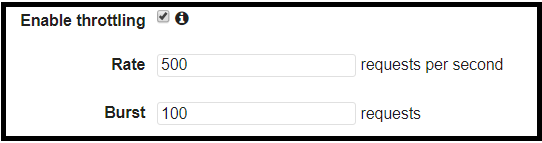
In the image above, the maximum flow of requests per second is 500, and the depth of the bucket is 100 requests, and thus 100 requests can be handled in a given time. After a request has been processed, it leaves the bucket and allows other requests to be processed; the request processing rate sets the pace. If the bucket is full, the requests will be handled at the next cycle (next second). However, in case the incoming requests flow higher than the processing rate, then the request is rejected, and an error is returned.
A client shall receive an error in case his call has exceeded the threshold:
The remote server returned an error: (429)
AWS allows defining the rate and the burst parameters in two places: the Stage and the Usage plan.
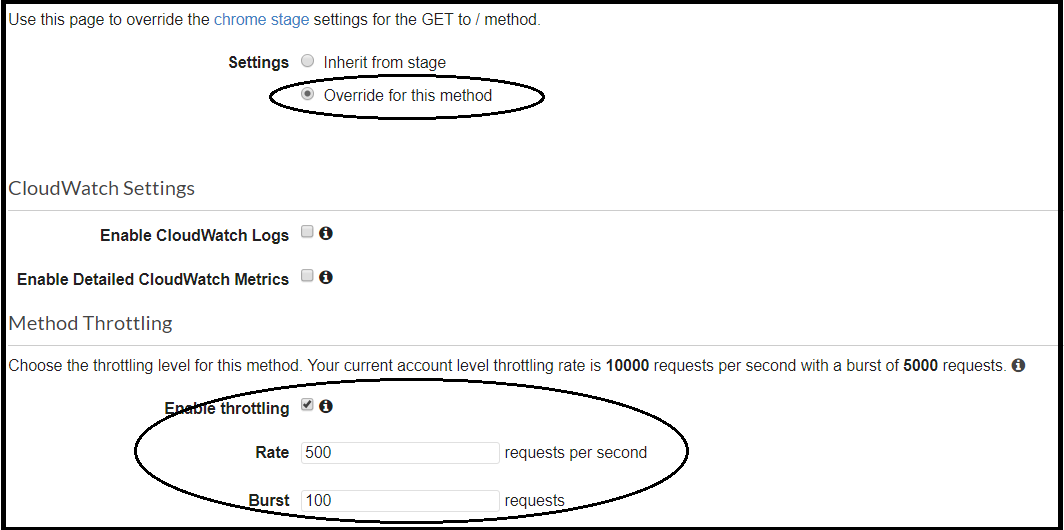
Stage Definitions
By default, a definition on the stage level is permeated to all the methods under the same stage. Nevertheless, you can override this definition per method by selecting “override for this method”:
Setting the Throttling Parameters in a Usage Plan
Before addressing the throttling parameters in a usage plan, let’s briefly describe the concept of a usage plan. In short, a usage plan is a set of rules that operates as a barrier between the client and the target of the API Gateway (i.e. a Lambda function). This set of rules can be applied to one or more APIs and stages.
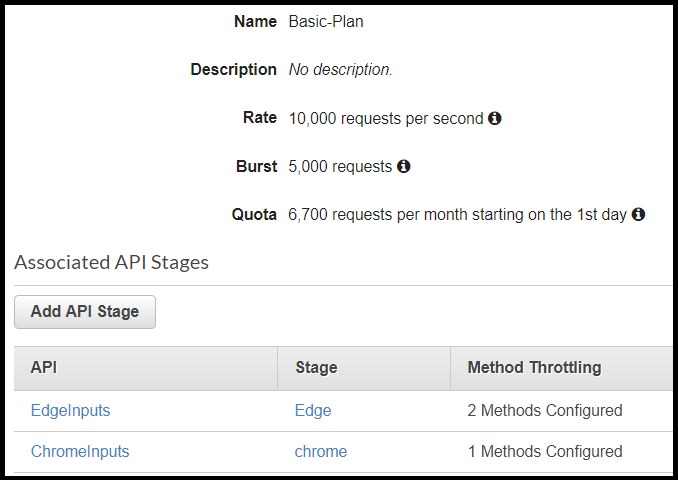
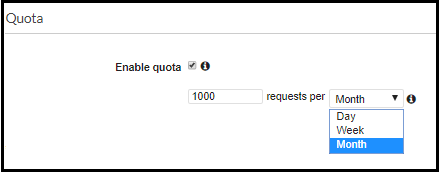
Besides the throttling definition, a usage plan can set the quota for incoming requests, which is the number of requests per period (day, week, month). Limiting the quota is more for a business case than for load control purposes, as it limits the absolute number of requests per period.
The quota feature enables avoiding a situation when an API Gateway method is flooded with unwanted traffic below the radar. It is recommended to use this feature to avoid bursting your budget in a development environment. As for production environments, this feature may be risky, as you can create a denial of service for legit requests.
As mentioned, the advantage of a usage plan is the granularity it provides. The throttling parameters for a method (i.e. GET, POST) can be defined in a single location rather than scattered in each stage separately. This simple configuration can prevent confusion and facilitate standardisation across different stages and methods.

Which has the precedence?
So, we saw that the throttling definition could be configured in three different places (Stage level, Usage plan level, and an individual method under a usage plan). Who wins then?
In case all the three are configured, the precedence is granted to the lower values. For instance, if a rate definition in a usage plan is lower than the defined rate in the Stage, then it supersedes the stage’s definition.
On top of simplifying the throttling management by allowing a unified configuration, a usage plan has another useful feature that facilitates controlling the requests flow — setting API Keys, which leads us to the next section.
2. API Key
The API Key is a string used to authorise calls in a low-level way; the server expects to receive this authorisation string as part of each request’s header. Unless the header includes a valid API Key, the API Gateway rejects the request. It is a simple way to validate requests and distinguish between authorised and arbitrary requests.
Setting the API key is done on the server level; hence, you can disable or delete an existing API key and cause all incoming requests using this key to fail (error 403). Practically it forces the requests to align with a new API key, which can be a way to distinguish between obsolete and new requests.
Generating an API Key
The API Key can be either autogenerated by AWS or customed by the user.
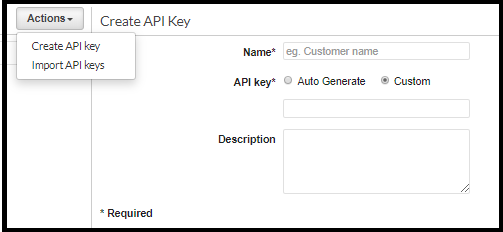
Another option is to import one or more keys in a CSV format and then assign them into existing usage plans (one or more). The mandatory fields are the key and its name (the column names are not case sensitive):
Name,key,description,Enabled,usageplanIds MyApiKeyName,apikeyuniqueForMe,A descriptive information,TRUE,c7y23b
Associating the API Key with a Usage Plan
To be applicable, the API Key must be associated with a usage plan, one or more; otherwise, it will not be attached to any API. Once attached, the API keys are applied to each API under the usage plan.
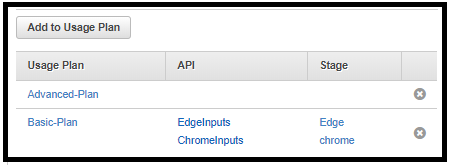
A usage plan can have one or more keys; when the API key is disabled, it becomes obsolete from all its usage plans.
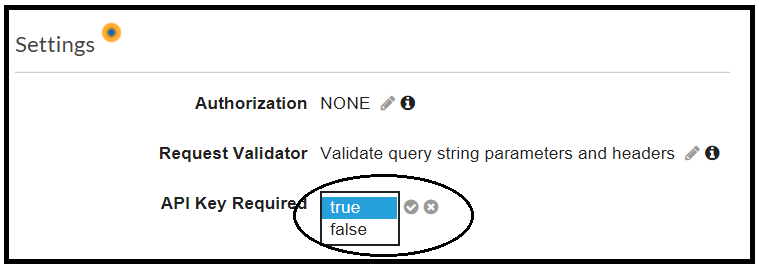
The last step to enforce the usage of an API Key is enabling this feature in the resource level, under the Method Request definition.
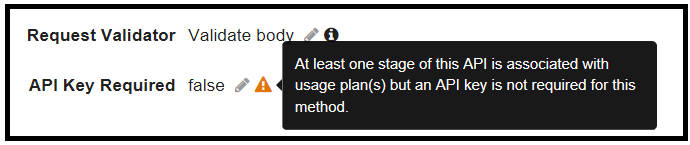
When a resource is associated with a usage plan that contains a key, but the API Key is not set to Required, AWS presents a warning tooltip:
The API Key in action
Let’s see the API Key in action and exemplify the API key as part of the header (screenshot using Postman):

In the example above, the request will yield a 403 error as the API Key is not part of the header (the checkbox is not ticked):
{ "message": "Forbidden" }
But, when calling the service with a valid API key, the response status is as expected (200).
I find the API Key feature useful to filter unsolicited requests. When developing an API that is exposed to the world, it can assure only authorised calls will be handled. Worth to mention that it is not a proper way to apply authorisation to the API method; the key is exposed in the header, and any malicious attacker can imitate a call using it. Therefore, the recommendation is to use authentication services like AWS Cognito or standards like OAuth.
3. Caching
Although caching does not restrict access, it functions as a barrier between the request and its execution; it can reduce the invocations of a Lambda function or other API Gateway end-target.
The caching properties are defined on the highest level of a Stage, but it can be overridden in each method as well, which allows flexible definition per method.
Setting the Cache Parameters
The caching mechanism is based on a caching key, which is a combination of all cache parameters and their values. For example, assuming the parameter param1 is signed to be a cache parameter, then calling tomethod?param1=111¶m2=222 and method?param1=111¶m2=333 will yield the same response; the response will be returned from the cache and will not be generated from the invocation’s target.
Another interesting example is when enabling API cache without setting any cache parameter. In this case, any URL will be considered as a cache key and thus method?param1=111¶m2=222 will return the same response as method?param1=444¶m2=333 .
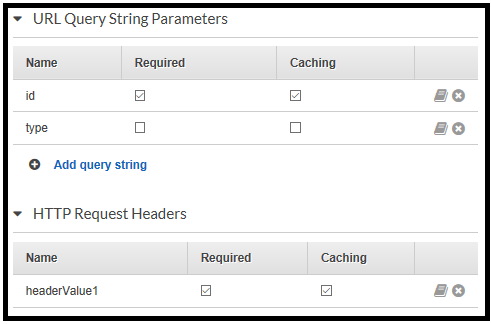
The cache parameters are defined for each API operation (GET, POST, PUT); both header and query string can include cache parameters.
Caching and CORS
Since the API Gateway populates the cache based on the cache parameters, different clients can send the same parameters and receive the same cached response. This behaviour makes sense, but there is a nuance when handling CORS response.
A CORS response should include Access-Control-Allow-Origin in its header; thereafter, the browser, which executed the call, validates if the origin is allowed to the response: if the caller, the source, is absent from the permitted origins, the browser raises an error (mostly Javascript error).
An edge case can happen if, by any chance, another client has populated an entry in the cache while using the same cache keys as our CORS call. In this case, the response will lack the essential header-value, and thus the response will be rejected by the client.
To overcome this scenario, it is better to add a header-parameter, named Origin or origin (since the parameters are case-sensitive), as a cache parameter; it will enforce building a combined cache key that includes the origin. With that, the entry in the cache will be populated with the origin’s value and bypass the edge case described above. For further reading about CORS calls, click here.
Client Cache-Control: What? How?
An interesting nuance about controlling the cache: a client can bypass the cache mechanism by setting a parameter in the request’s header Cache-Control: max-age=0 . We can decide how the API Gateway respond to this header’s value. There are three options:
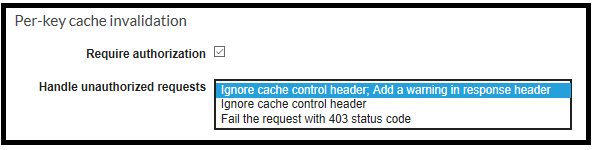
The first option ignores the Cache-Control key but returns a warning in the response header:
199 Cache-control headers were ignored because the caller was unauthorized.
The second option just ignores the request, without providing any signal it existed. The third option will generate a 403 error:

In case you strictly want to reject any misalignment and rigidly enforce requests’ structure, the last option is recommended as it raises an error. This error is logged and can be monitored later on.
There is another way to control the cache invalidation, but it is more rigid as it uses the underlying policy layer. Like any other policy, it allows a low-level control. You can allow or deny the cache invalidation based on a specific user/role or anyone. All you have to do is edit the Resource Policy of the API, as the example below demonstrates:
{
    "Version": "2012-10-17",
    "Statement": [
        {
            "Effect": "Deny",
            "Principal": "*",
            "Action": "execute-api:InvalidateCache",
            "Resource":
                "arn:aws:execute-api:us-west-2:933711111590:v4sxxxxc/*/GET/test"
        }
    ]
}
In this case, the server will throw a 403 error with a detailed explanation:
User: anonymous is not authorized to perform: execute-api:Invoke on resource: arn:aws:execute-api:us-west-2:********1590:v4smxxxbc/test/GET/test
Lastly, What About Monitoring?
Well, we covered three techniques to offload the number of invocations and filter them. Now, how do we measure that? Well, the answer is CloudWatch.
Measuring the number of Errors
CloudWatch metric 4XXError displays the number of errors over a period. These errors can originate from bursting the throttling definitions, lacking an API key, or missing permissions. These errors can be analysed in the CloudWatch insights tool (see an example for an SQL-like query) or by diving into the raw logs themselves.
fields @timestamp, @message
| filter @message like '403'
| sort @timestamp desc
| limit 200
Monitoring the Cache Usage
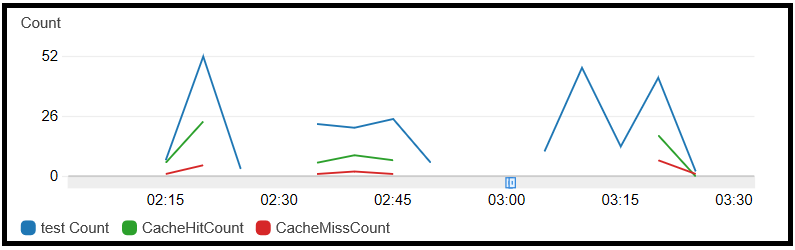
Examining the logs shows tangible evidence if using the cache is lucrative. CloaudWatch exposes two metrics to measure the usage of cache per API or stage. These metrics can reveal whether the cache’s parameters should be changed, for example, extending its capacity or TTL (time-to-live); the graph below presents the cache hits and its misses:
Analysing metrics and raising alerts when specific threshold bursts are recommended to ensure our parameters and configuration are appropriately tuned.
Wrapping-up
Well, that’s it for now. I hope you enjoyed reading this blog-post and find its content useful; use these API Gateway features to filter invocations and avoid unnecessary calls.
Until the next time, keep on clouding ⛅
— Lior
