

After reviewing ROS’s background and theory (introduction to ROS), this article focuses on implementing the ROS’s three communication patterns: Publisher-Subscriber, Client-Server, and Actions.
I aimed to give more in-depth examples than the common ones that can be found in other tutorials online; so, the examples and the code described here include custom messages, more callback methods, and additional flows that can be used to evolve test-cases.
Without further ado, let’s dive in.
Build a Publisher-Subscriber Application
This pattern should be used for continuous data stream distribution from the source to one or more destinations, as the channel is open after it has been established.
This chapter describes the two sides of the communication. The instructions on how to set up the Publisher-Subscriber application are described in the previous article; now, let’s describe how the application works.
Set up the Environment
After creating a workspace, navigate to the src directory and run the following command catkin_create_pkg <pkg-name> <pkg-dependencies>; for example:
$ catkin_create_pkg my-test-pkg roscpp rospy std_msgsOnce the package is created, it has two configuration files under the root directory: CMakeLists.txt and package.xml. The CMakeLists file holds the configuration for building the package; it is the input for the CMake build system. You can find the package name, its dependencies, libraries, tests, installation rules, and more.
The package.xml is the package’s manifest; it holds its dependencies, version, author, etc.
To compile the new package, navigate back the to the root directory of the workspace and run the command catkin_make.
A note regarding how to build and run the Python files: since Python is an interpreted language, catkin_make is not always required to compile the files after they have been altered; however, in case of files to be generated, like custom messages, catkin_make is required. Before running the files, you should make them executable by runningchmod +x <file>.py.
The Publisher’s Code
The Publisher defines the topic name, the message type, and the queue size (although rospy is synchronous, this parameter is meaningful). Upon loading and registering in the master node, there is a match between the Publisher and the Subscriber based on the topic name.
Next is to define the node’s name. The node’s name should be unique; therefore, to make sure the name is unique, it’s recommended to add the anonymous=True parameter. This name is not carved in stone, and it can change before launching the node. For example:
$ rosrun chatwithme listener.py __name:=<my-name>Lastly, the Publisher publishes messages calling the method Publisher.publish while the node is still active (in a loop until it shuts down). The sleep frequency is defined in the Rate method (the parameter is in hertz, meaning how many cycles per second).
# the topic message is String (not the Python string, but the std_msg String)
# the queue size is the number of messages that will be retained before starting to delete (in case there are no subscribers).
pub = rospy.Publisher('chatwithme', String, queue_size=5)

# the name of the node is dynamic to avoid multiple nodes with the same name.
# With that, multiple listeners can run simultaneously.

rospy.init_node('my_talker', anonymous=True)
rate = rospy.Rate(1) # in hz
while not rospy.is_shutdown():
        # define the message
        message = "Hi from {}, the time is {}".format(rospy.get_caller_id(), rospy.get_time())
        rospy.loginfo("sent a message to %s subscribers" % pub.get_num_connections())
        # publish the message to all subscribers
        pub.publish(message)
        # keeping the publisher active, otherwise it will be shutdown
        rate.sleep()
A word about the queue_size parameter: messages are published into a message queue. If messages are published more quickly than they can be sent, the queue_size is the capacity of how many messages can be buffered up before losing messages.
The size of the buffer should be considered and tune based on the needs. On the one hand, it may be necessary to keep messages and avoid dropping them, but on the other hand, there are drawbacks for a large queue: a big queue consumes memory, and allowing the subscriber to lag while consuming old messages; there may be cases that allowing latency impairs the system.
The Subscriber’s Code
Similarly to the publisher, the initialization of the Subscriber’s node includes its name. After that comes the registration to the topic, the message type, a callback method, and a queue size (optional).
# In ROS, nodes are uniquely named. If two nodes with the same
# name are launched, the previous one is kicked off. The
# anonymous=True flag means that rospy will choose a unique name for this node.
# With that, multiple listeners can run simultaneously.

rospy.init_node('my_listener', anonymous=True)

# defining the subscriber's parematers (including a queue size)
rospy.Subscriber('chatwithme', String, callback, queue_size=10)

# spin() simply keeps python from exiting until this node is stopped
rospy.spin()
The Subscriber can have a queue size too. When new messages arrive, they are stored in a queue until ROS gets a chance to execute the callback function. This queue_size parameter is the maximum number of messages that ROS stores in this queue at one time. So, if messages are published in a higher frequency than the subscriber can process and the queue hits the limit, then unprocessed messages will drop.
The callback method is the heart of the subscriber’s node; this is the place to implement the business logic. The callback method receives the message as an argument and then executes a certain logic based on this input. The example below is pretty simple; it printed the message:
def callback(data):
    rospy.loginfo(rospy.get_caller_id() + ' received: %s', data.data)
You can play with this application (see here how to); the full source code is on GitHub: https://github.com/liorksh/ros/tree/main/chatwithme.
Now, let continue to the next application type.
Build a Client-Server Application
This pattern should be used for short one-time calls from the source to its destination. This is not asynchronous communication, and thus it is more suitable for fast interactions.
As opposed to the Publisher-Subscriber application, the Client-Server is synchronous and stateless. Each interaction between the client and the server is blocking, and once it has finished, the communication ends. Furthermore, there can be one server (and many clients), in contrast to a limitless number of publishers in the previous pattern (see the Publisher-Subscriber example in my previous article).
Most of the examples online show the service AddTwoInts, which receives two integers and returns their sum. I wanted to exemplify a ROS Client-Server application built from scratch that is more sophisticated; therefore, this example includes a custom-defined message and more detailed steps, so the reader can understand what’s happening under the hood.
The steps to define a Client-Server application are:
- Create a package and configure it.
- Defining the service messages (two messages: one for the server and one for the client).
- Create a Server node.
- Create a Client node.
- Run the server and the client.
Step 1: Set up the Environment
Let’s start from the very beginning, with a new package. A Client-Service application requires more dependencies than a Publisher-Subscriber application (message_generation and message_runtime) since the client-server interaction is exchanging messages.
Under our workspace, in the src directory level, run the command:
$ catkin_create_pkg calculatelocation rospy std_msgs message_generation message_runtime
This command will create a package named calculatelocation. Under the package’s directory, we will find the two configuration files packages.xml and CMakeLists.txt. Next is to ensure the package is configured to support the creation of the service’s messages; the packages.xml file should include the following:
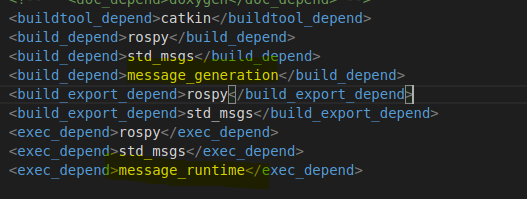
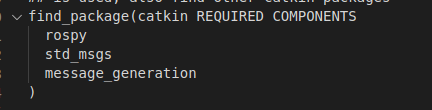
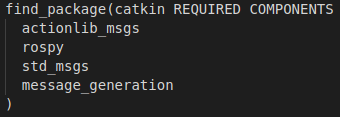
In the CMakeLists.txt file, make sure the message_generation exists under the section find_package:
Step 2: Create the Client and Service Messages
Create a directory named srv under the workspace directory; that’s at the same level as src.
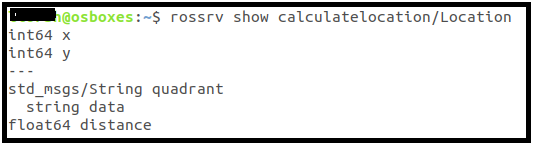
In this example, the message name is Location; create a Location.srv file under the directory srv. The file is composed of two sections, separated by three dashes. The top part is the request message; the bottom is the response message. The code below defines a request message composed of two integers, while the response has two variables — a String message and a float number.
#Request
int64 x
int64 y

---
#Response

std_msgs/String quadrant

float64 distance
Next, to allow the catkin_make command to be familiar with this file, alter the CMakeLists.txt file and add the Location.srv (in the add_service_files section). Also, the example below includes the dependency std_msg since the response message includes this an std_msgs object:

Now run the run catkin_make command.
Later, to verify the service is created properly, run the command rossrv list, you should see the newly created service on the returned list:

You can also see the messages of our service to be sure they were generated successfully; run the command rossrv show <service-name>:
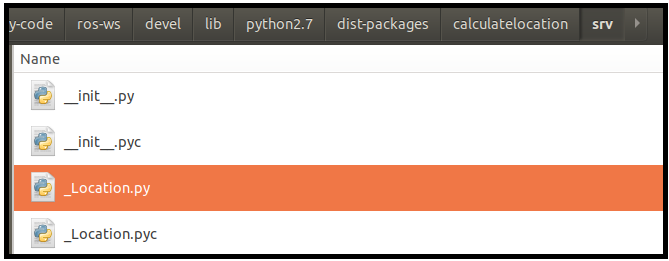
Behind the scenes, after running the catkin_make the framework generated classes with the service response and request; the classes’ names are a combination of the message name and the prefix Request or Response, respectively. The classes are generated under the following path <workspace>/devel/lib/python2.7/dist-packages/<service-name>/srv. This is an example from my environment:
It is recommended to explore the Python file to learn more about the serialization and deserialization of these messages.
Step 3: The Server’s Code
A short review of the code of the service. It is composed of loading the service (run_service method) and a callback method (service_callback), which is executed when a request arrives. In this example, the service receives coordinates and return their quadrant and the distance from the origin.
def run_service():
    # define the service: name, messaged and a callback method.
    pub = rospy.Service('myLocation', Location, service_callback)

    # the name of the node is static, there be only one isstance of a service.
    rospy.init_node('calculateLocationNode')

    rospy.loginfo('starting the Calculate Location service')
    # keep the service running
    rospy.spin()

# receives coordinates and return their quadrant and the distance from the origin
def service_callback(req):
    quadrant = 'not found'
    rospy.loginfo('Received request to calculate: %s, %s', req.x, req.y)
    if req.x==0 and req.y==0:
        quadrant = 'origin'
    elif req.x<0:
        if req.y<0:
            quadrant = 'third'
        else:
            quadrant = 'second'
    else:
        if req.y<0:
            quadrant = 'third'
        else:
            quadrant = 'first'

    # create an instance of String object
    result = String()
    result.data = quadrant

    # calculate the distance from the origin
    distanceFromOrigin = math.sqrt(req.x**2 + req.y**2)

    # create a Response message and return to the server
    return LocationResponse(quadrant=result, distance=distanceFromOrigin)
For the full code, please refer to the GitHub repository.
Step 4: The Client’s Code
The client starts by creating a ROS node. It’s not mandatory, but I chose this option to be able to call other rospy methods. It continues by waiting for the service with a defined timeout; if the timeout reaches, an exception is thrown.
Once the service is available, a call is made. It can be by creating and sending a LocationRequest object, or by calling the service directly with the LocationRequest parameters (without packaging them into an object).
The calling method returns a response object, and then the application prints its members.
def call_client(x,y):

    # init a node; not mandatory, but it allows using rospy.loginfo methods, and communicate with the node using ROS tools.

    rospy.init_node('myClient', anonymous=True)
    serviceName ='myLocation'

    # waiting to the service to load; this is a blocking call, but a timeout parameter can be provided.
    try:
        rospy.wait_for_service(serviceName,timeout=1)
    except rospy.ROSException as e:
        # the service is not available, an exception is caught
        rospy.logerr('%s', e)
        rospy.signal_shutdown('timeout has reached; shutting down the client')
        sys.exit(1)

    rospy.loginfo('found the service. Can continue :)')

    # call the service (base on its name) and type.
    proxy = rospy.ServiceProxy(serviceName, Location)

    # ----- Call the service using Request object ------
    # create a LocationRequest object (included in calculatelocation.srv package)
    req = LocationRequest(x, y)

    # send the Request object to the service, and receive a LocationResponse object

    respo = proxy(req)


    # another option to call the service, without creatin a Request object

    #respo = proxy(x, y)

    # prints the response (breakdown the Request object)
    rospy.loginfo('received:\nResponse class type %s\nquadrant: %s\ndistance from origin: %s',type(respo), respo.quadrant.data, respo.distance)

    # keep the node alive for a couple of second, until exiting
    rospy.sleep(5)
The Client’s code can be found on the GitHub repository.
Step 5: Run the Application
Finally, the fun part — running the application!
You should have the following files and directories (you can refer to GitHub repository too):
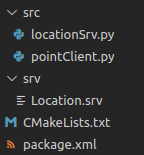
Now, run the catkin_make command, and don’t forget to make the Python files executable.
Run the service: rosruncalculatelocation locationSrv.py; run the client: rosrun calculatelocation pointClient.py. In this example, the client can be initiated with parameters (location, two integers) defined by the user; for example: rosrun calculatelocation pointClient.py 50 40 .
You can play with the application and run various scenarios:
- Notice that the client is waiting for the server to load (the waiting time is defined in the wait method); if the service is not available once the time-out reaches, an exception is thrown, and the client terminates with exit code 1.
- Running a second service exits the previous service; only one service can be active.
- You can run more than one client.
- Changing the client or the service scripts doesn’t require running catkin_make since these are Python scripts. However, changing the messages (Request or Response) requires rebuilding their respective classes, and thus you must run catkin_make.
- There are two commands to examine a ROS service —
rossrvandrosservice. The difference between these commands is that rossrvis a tool for inspecting service types, while rosserviceprovides access to running services. For instance:rosservice info <service-name>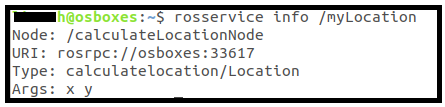
- Call the service while creating a message on the fly (without running the client):
rosservice call <service-name> <parameters>; for example:rosservice call /myLocation 5 6. The server receives the call and processes it.
In some cases, upon updating and running the service or the client, I received the following error: ‘ImportError: No module named <service>.’ I overcame this problem by calling the command source <workspace>/devel/setup.bash again (although it is already defined in the .bashrc file). This problem may be related to changing the dependency with external libraries.
Once again, the full code can be found on GitHub.
Build an Action-based Application
This pattern should be used for long-running routines that can run asynchronously, or when a non-blocking feature is required while providing feedback on the routine’s progress. Besides, Actions can be preempted in the midst of their execution, which gives another level of control on the remote execution.
The client-server communication is async; a message is received and registered into a topic, and then consumed by the server. With that, this pattern is somewhat a combination of the other two.
The steps to build an action-based application are:
- Create a package and configure it.
- Define the service message (two messages: one for the server and one for the client).
- Create a Server node.
- Create a Client node.
- Run the server and the client.
Step 1: Set up the Environment
Let’s prepare the environment; run the following command (under the src directory of our workspace) to create a new package named pingpong:
$ catkin_create_pkg pingpong rospy std_msgs actionlib_msgs
# create a new directory (to place the action messages)
$ cd pingpong

$ mkdir action
Next, similarly to the Client-Service application’s configuration, we need to update the CMakeLists.txt and the package.xml files:
- CMakeLists.txt: Add the message_generation to the find_package section:
- package.xml: add message_generation and message_runtime (follow the configuration below):
Now, let’s define the Action messages.
Step 2: Action Messages
Five message types are sent between the client and the server. The client initiates two (goal and cancel), while the server initiates three messages (status, result, and feedback).
Status messages:
- cancel — the Client can send cancellation to the server.
- status — the server notifies the clients on the current state of the goal.
Data messages:
- goal — the client sends the server its goal, which initiates the server’s logic.
- feedback — the server sends the client periodic information for a goal.
- result — the server sends the client one-time information upon completion of the goal.
After a goal is received on the server, the ActionServer creates a state machine to track the status of the goal:
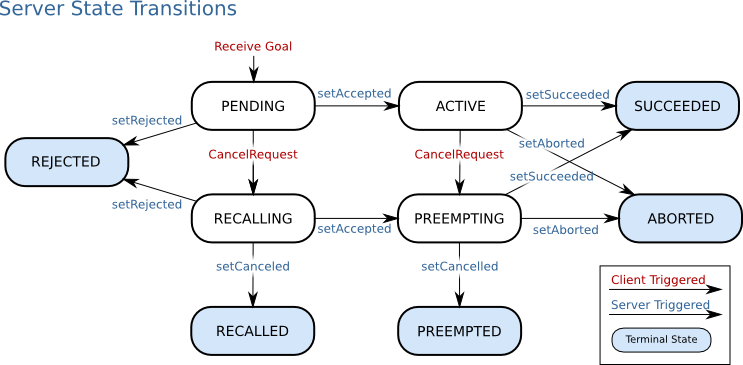
The messages are defined in one .action file, located in the action directory (at the same level of src). This file includes all the action messages, divided by dashes:
#goal
int64 maxScore
---
#result
std_msgs/String winner
std_msgs/Duration gameDuration
int32[] score

---
#feedback
int64 playerClient
int64 playerServer
In the example I brought here, the name of the file is PingPongGame.action. Next, the CMakeLists.txt file should be updated with the newly created action file (remember to uncomment the lines, as exemplified below):

Now, we can run catkin_make to build the messages and ensure the configuration is set correctly. Once catkin_make run successfully, let’s run rosmsg to review the newly created messages:
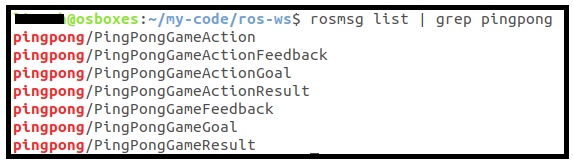
There are seven messages, but only the last three are user-generated and transferred deliberately from the client to the customer and vice versa. The actionlib uses the four messages that have Action in their namefor internal handling of the action gaols.
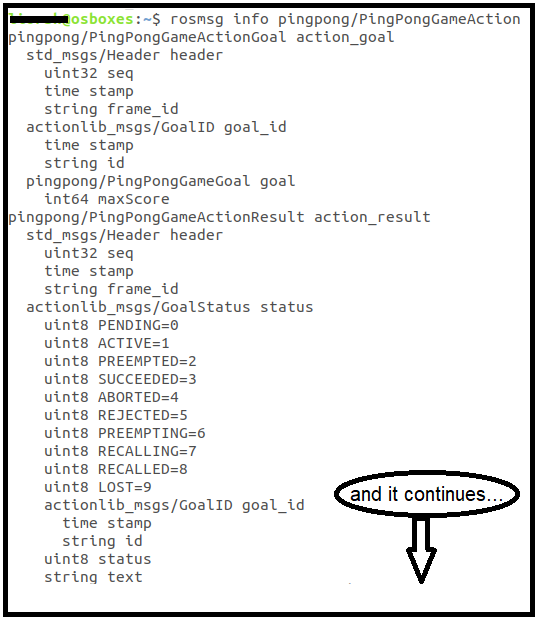
The first message (pingpong/PingPongGameAction) includes essential information about the other messages, and therefore its importance; the client sends it to the server when the communication instantiates. You can learn about the message content by running the command rosmsg info pingpong/PingPongGameAction :
Step 3: Create the Server
The complete code can be found on the GitHub repository, but there is one point worth mentioning — handling new goals and cancellation requests.
The pingpong server application handles a scenario in which a new goal is received (is_new_goal_available method). When it happens, the server chooses to accept it (accept_new_goal method), the previous client is thrown (return status PREEMPTED), and the new goal supersedes the previous one.
......
     while gameOn:
            if self._serverFlags & self.ALLOW_NEW_GOALS and self.actionServer.is_new_goal_available():
                # receiving a new goal triggers also a 'is_preempt_requested', therefore is should be handled first.
                goal = self.actionServer.accept_new_goal()
                # reset the previous feedback object
                feedback = PingPongGameFeedback()
                rospy.loginfo('Received a new score: %s',goal.maxScore)
            elif self._serverFlags & self.ALLOW_PREEMPT and self.actionServer.is_preempt_requested():
                rospy.loginfo('received preempt request')
                # changes the status of the server, otherwise the server will be exited with an error
                # since there's no return value and a preempt request was received.
                # You can comment this line and see the error that is received on the client
                self.actionServer.set_preempted()
                gameOn = False

            elif (feedback.playerClient>=goal.maxScore) or (feedback.playerServer>=goal.maxScore):
                # if the goal was achieved - end the loop.
                gameOn = False
            else:
                # publish the score and continue for another round
                self.actionServer.publish_feedback(feedback)
                feedback.playerClient += random.randrange(1,4)
                feedback.playerServer += random.randrange(1,4)
                rospy.sleep(1)

        # when the loop ends - set goal to succeed when required
        if self._serverFlags==0 or self.actionServer.preempt_request==False:
            endTime = rospy.get_rostime()
            gameDuration = endTime-startTime
            rospy.sleep(1)

            if feedback.playerServer==feedback.playerClient:
                winner = "tie"
            elif feedback.playerServer>feedback.playerClient:
                winner = "Server"
            else:
                winner = "Client"

            # define a Result object
            #result = pingpong.msg.PingPongGameResult
            result = PingPongGameResult()
            result.gameDuration.data = gameDuration
            result.winner.data = winner
            result.score = [feedback.playerClient, feedback.playerServer]

            # publish the result message
            self.actionServer.set_succeeded(result)

......
Without handling this scenario, the new goal has to wait until processing the previous goal is finished.
The complete code can be found on the GitHub repository.
Step 4: Create the Client
Let’s dive into the Client’s code. The code below has a callback method for each response from the server (registration, feedback, and done).
  # initiate the client with all the callback methods
  self.actionClient.send_goal(goal,
            active_cb=self.action_active,

            done_cb=self.action_returnGoal,
            feedback_cb=self.action_returnFeedback)

  ....
    def action_returnGoal(self,statusInt, result):

        # see the status legend: http://docs.ros.org/en/kinetic/api/actionlib_msgs/html/msg/GoalStatus.html
        rospy.loginfo('Received status: %d, Client stats: %s', statusInt,  self.actionClient.get_state())
        if statusInt==actionlib.GoalStatus.SUCCEEDED:
            rospy.loginfo('Game ended:\nWinner: %s, Game duration: %d.%d, Client: [%s], Server[%s]',
                result.winner.data,
                result.gameDuration.data.secs,result.gameDuration.data.nsecs/10000,
                result.score[0], result.score[1])
        elif statusInt==actionlib.GoalStatus.PREEMPTED:
            rospy.logwarn('This goal of this client was aborted')

    def action_returnFeedback(self, score):
        rospy.loginfo('Current Score: Client[%s], Server[%s]', score.playerClient, score.playerServer)
In the client application, I added the option to send a Preempt message (enter ‘p’) or cancel the execution (enter ‘c’); refer to utils.py file.
The full code can be found on the GitHub repository.
Step 5: Run the Application
Before running the client and the server, don’t forget to make their Python files executable (chmod +x <file-name>).
In this application, the client and the server can get parameters; let’s view them:
- The server has an optional parameter to indicate whether it can accept new goals or cancellation messages:
rosrun pingpong serverPP.py <flag>— the server responds to new goals messages (flag=1), cancellation commands (flag=2), or both (flag=3). The default is 0, which means the server doesn’t react to these messages. - The client has an optional parameter to set the desired score of the game:
rosrun pingpong clientPP.py 15— the goal is set to15; the first reaches to this score wins; the default value is 10.
In addition, the client responds to the user’s command-line input:
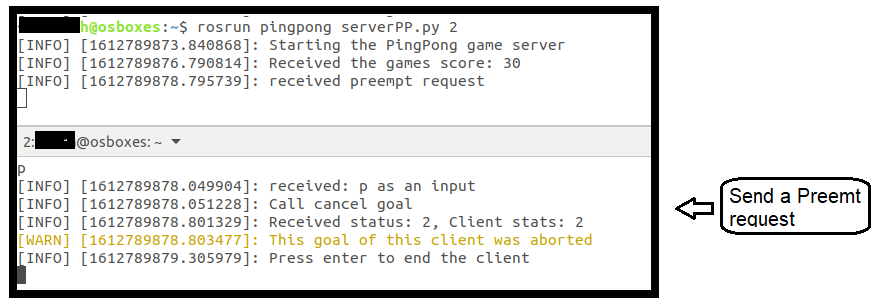
‘p’ — cancels the current goal
‘c’ — cancel all goals
‘q’ — quits and ends the client node’s execution.
Client-Server Messages Exchange
The client-server communication is async; a message is received and registered into a topic; therefore, the callback methods have a significant role.
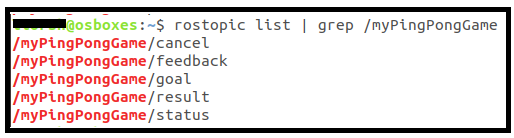
After starting the server, several topics are created; these topics are used to pass messages between the client and the server, one for each type:
The name of the client node is generated to allow more than one running node. When running another client, it takes over the previous goal if the server is configured to receive new goals; otherwise, it will wait until the previous goal’s processing is completed.
Since this is a simple Action Server/Client application, it implements a non-blocking execution of one goal at a time. If a new goal is received at the server, it registers; the active goal is completed before a new goal will be processed.
Use Cases
You can run the following scenarios to learn more about this application:
- Run the client when the server is not active:
- The client will wait until a certain timeout and then throw an exception.
- Run the server without the option to accept new goals (no parameter):
- if another client is turned on, it will wait until the previous goal was reached; it will only start interacting with the server afterward.
- Run the server with accepting new goals (
rosrun pingpong serverPP.py 1):- Run a client (
rosrun pingpong clientPP.py 30), and then run another one (rosrun pingpong clientPP.py 20). The second client stops the execution of the first one, and the server starts processing it: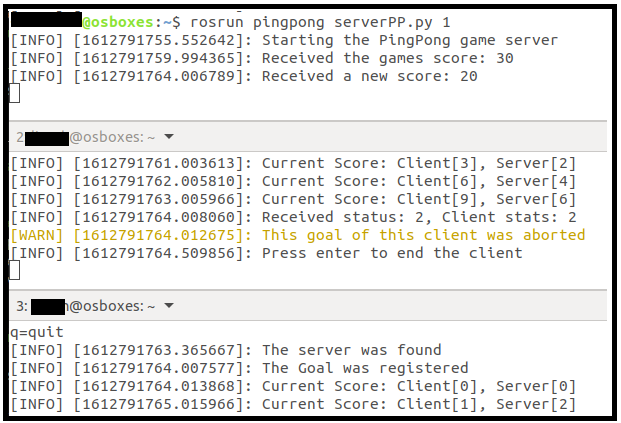
- Run the client and then insert q or c to the CLI.
The server throws an error since the execution is ended without setting the status properly (no goal was returned).
- Run a client (
- Run the server with accepting preempt requests (
rosrun pingpong serverPP.py 2):- Send a Preempt message from the client (enter p in the CLI); the client receives the reject from the server.
- Another scenario:
Run one client, then run a second client; it creates a preempt message when the new client takes over the old one without handling the ‘accept new goals’ properly. That’s because the new goal is considered a Preempt too.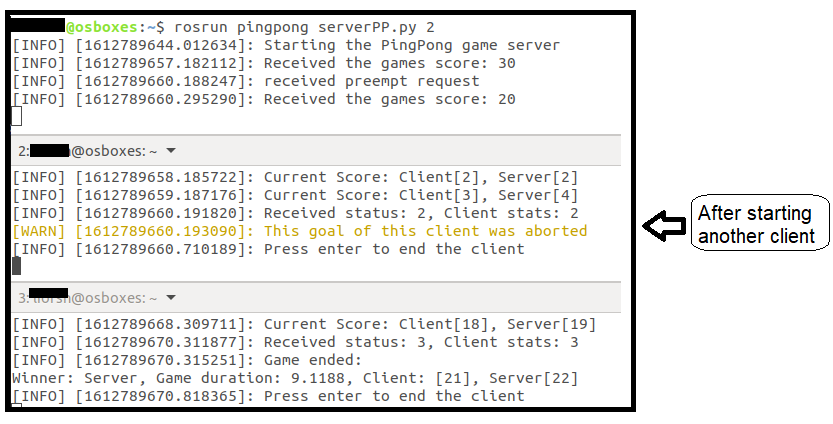
- Send a Preempt message from the client (enter p in the CLI); the client receives the reject from the server.
- Run the server, without the feature to accept new goals or preempt (
rosrun pingpong serverPP.py), run one client, then run a second client and cancel the first client. The first client ends immediately, and the processing of the second client starts right after.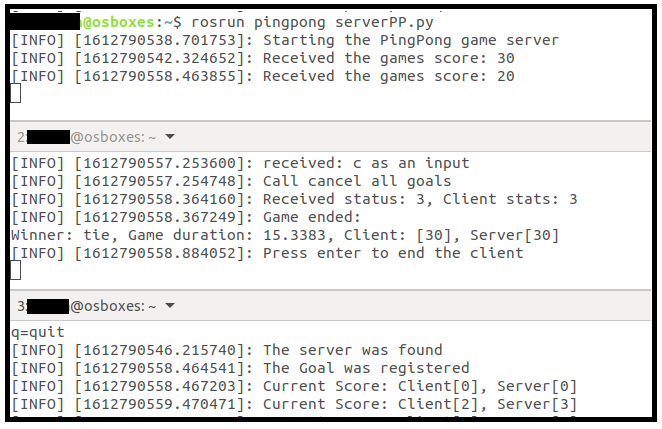
Explanation of the Preempt Status
Preempted status is returned when the goal was canceled by either another goal or a cancellation request sent to the action server. This means is_preempt_requested should be handled after handling new goal requests to ensure it doesn’t supersede the latter.
The main difference between Cancel and Preempt is:
- Cancel : Stop processing current active goal(s)
- Preempt : Stop processing current goal(s) in favor of new goal(s) given.
Calling accept_new_goal methodaccepts a new goal when one is available. The new goal’s status is set to active upon acceptance, and the status of any previous goal is set to preempted. Accepting a new goal implies successful preemption of any older goal; the old goal’s status will be changed automatically to reflect success.
Last Words
This article describes the implementation of the three communication patterns in ROS. The emphasis was on creating an application from scratch using custom messages and understanding the nodes’ underlying connections for each pattern.
Since the goal was to show additional aspects for each pattern, the examples above differ from the other tutorials’ prevalent examples.
I hope you find this content valuable.
Keep on coding!
— Lior
References:
